納品データと物品受領書・請求書・領収書をバラバラ個別に無駄に作っていないか?
確定した納品データであれば・・
単純に納品伝票=物品受領書=請求書=領収証となる・・・
あとはそのまま
同一内容を表書きを変えて印刷するだけとなるので・・
一気に作って印刷してしまう。
一気に作って印刷してしまう。
1.実際の納品データが確定して、売り上げデータをCSVファイルにストックした後
次は納品データの印刷となりますが、このときに一括で、物品受領書=請求書=領収証も
印刷してしまう。以下50行の伝票を作り、プリントアウトのボタンを作成。

2.そのコマンドボタンに呼び出すプログラム名称を記載。
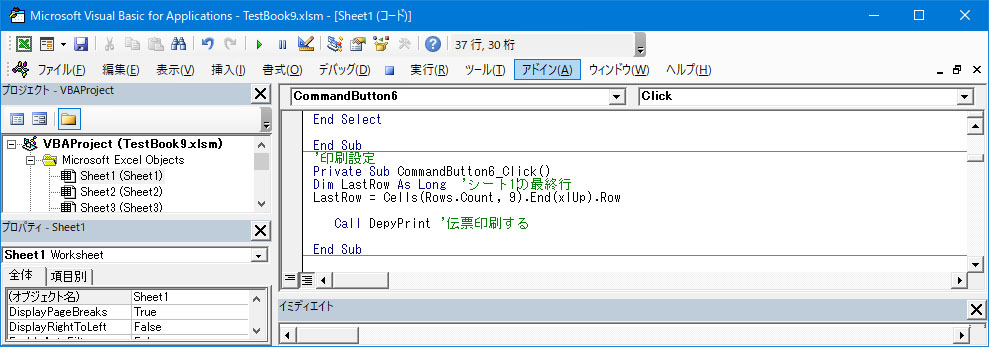
3.今度はその呼び出し先にコードを書く。
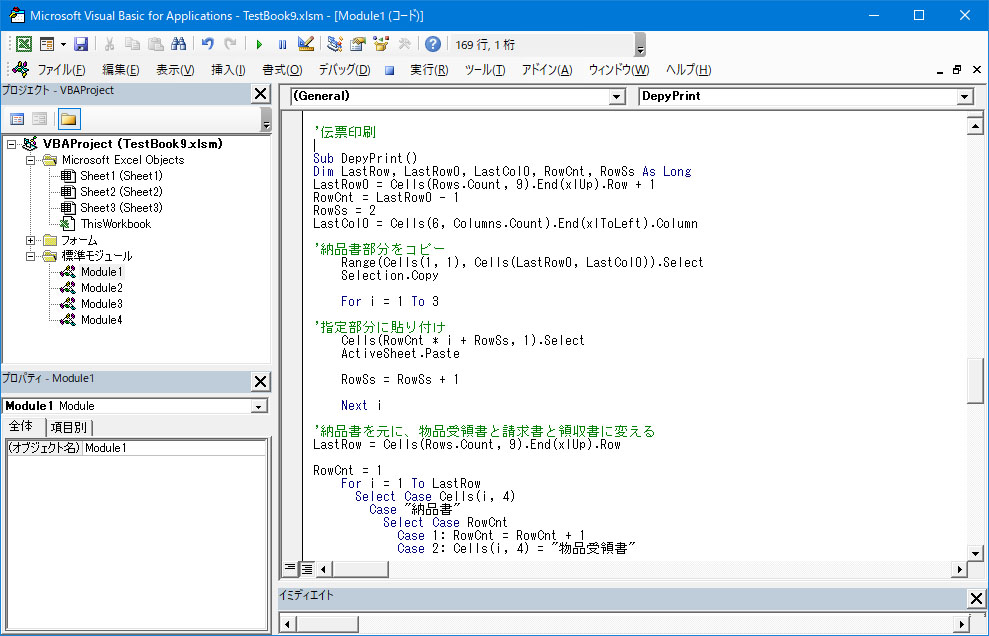
書くコードは以下の通り
‘————————————————————————–
‘伝票印刷
Sub DepyPrint()
‘変数の設定
Dim LastRow, LastRow0, LastCol0, RowCnt, RowSs As Long
‘変数への値の代入
LastRow0 = Cells(Rows.Count, 9).End(xlUp).Row + 1
RowCnt = LastRow0 – 1
RowSs = 2 ’行の誤差が出るのでその修正数
LastCol0 = Cells(6, Columns.Count).End(xlToLeft).Column
‘納品書部分をコピー
Range(Cells(1, 1), Cells(LastRow0, LastCol0)).Select
Selection.Copy
For i = 1 To 3 ’繰り返し
‘指定部分に貼り付け
Cells(RowCnt * i + RowSs, 1).Select
ActiveSheet.Paste
RowSs = RowSs + 1
Next i
‘納品書を元に、物品受領書と請求書と領収書に変える
LastRow = Cells(Rows.Count, 9).End(xlUp).Row
RowCnt = 1
For i = 1 To LastRow
Select Case Cells(i, 4)
Case “納品書”
Select Case RowCnt
Case 1: RowCnt = RowCnt + 1
Case 2: Cells(i, 4) = “物品受領書”
Rows(i – 1 & “:” & i – 1).RowHeight = 5.25
Cells(i + 1, 8) = “受領印”
Rows(i + 2 & “:” & i + 3).RowHeight = 12
With Range(Cells(i + 1, 8), Cells(i + 2, 8))
.Merge
.VerticalAlignment = xlTop
.HorizontalAlignment = xlCenter
.Font.Size = 7
.Borders(xlEdgeLeft).Weight = xlMedium
.Borders(xlEdgeTop).Weight = xlMedium
.Borders(xlEdgeBottom).Weight = xlMedium
.Borders(xlEdgeRight).Weight = xlMedium
End With
With Range(Cells(i – 2, 2), Cells(i – 2, 11))
.Borders(xlEdgeBottom).LineStyle = xlContinuous
.Borders(xlEdgeBottom).Weight = xlThin
End With
RowCnt = RowCnt + 1
Case 3: Cells(i, 4) = “請求書”
Rows(i – 1 & “:” & i – 1).RowHeight = 5.25
Rows(i + 2 & “:” & i + 3).RowHeight = 12
With Range(Cells(i – 2, 2), Cells(i – 2, 11))
.Borders(xlEdgeBottom).LineStyle = xlContinuous
.Borders(xlEdgeBottom).Weight = xlThin
End With
RowCnt = RowCnt + 1
Case 4: Cells(i, 4) = “領収書”
Rows(i – 1 & “:” & i – 1).RowHeight = 5.25
Rows(i + 2 & “:” & i + 3).RowHeight = 12
Cells(i + 2, 5) = “領収いたしました。ありがとうございます。”
Cells(i + 2, 5).Font.Size = 10
With Range(Cells(i – 2, 2), Cells(i – 2, 11))
.Borders(xlEdgeBottom).LineStyle = xlContinuous
.Borders(xlEdgeBottom).Weight = xlThin
End With
End Select
End Select
Next i
‘プリント設定(ここはプリンターによって異なる)
Range(“A1:K” & LastRow + 1).Select
Application.CutCopyMode = False
ActiveSheet.PageSetup.PrintArea = “$A$1:$K$” & LastRow + 1
Application.PrintCommunication = False
With ActiveSheet.PageSetup
.PrintTitleRows = “”
.PrintTitleColumns = “”
End With
Application.PrintCommunication = True
ActiveSheet.PageSetup.PrintArea = “$A$1:$K$” & LastRow + 1
Application.PrintCommunication = False
With ActiveSheet.PageSetup
.LeftHeader = “”
.CenterHeader = “”
.RightHeader = “”
.LeftFooter = “”
.CenterFooter = “”
.RightFooter = “”
.LeftMargin = Application.InchesToPoints(0.25)
.RightMargin = Application.InchesToPoints(0.25)
.TopMargin = Application.InchesToPoints(0.75)
.BottomMargin = Application.InchesToPoints(0.75)
.HeaderMargin = Application.InchesToPoints(0.3)
.FooterMargin = Application.InchesToPoints(0.3)
.PrintHeadings = False
.PrintGridlines = False
.PrintComments = xlPrintNoComments
.PrintQuality = -3
.CenterHorizontally = False
.CenterVertically = False
.Orientation = xlPortrait
.Draft = False
.PaperSize = xlPaperA4
.FirstPageNumber = xlAutomatic
.Order = xlDownThenOver
.BlackAndWhite = False
.Zoom = False
.FitToPagesWide = 1
.FitToPagesTall = False
.PrintErrors = xlPrintErrorsDisplayed
.OddAndEvenPagesHeaderFooter = False
.DifferentFirstPageHeaderFooter = False
.ScaleWithDocHeaderFooter = True
.AlignMarginsHeaderFooter = True
.EvenPage.LeftHeader.Text = “”
.EvenPage.CenterHeader.Text = “”
.EvenPage.RightHeader.Text = “”
.EvenPage.LeftFooter.Text = “”
.EvenPage.CenterFooter.Text = “”
.EvenPage.RightFooter.Text = “”
.FirstPage.LeftHeader.Text = “”
.FirstPage.CenterHeader.Text = “”
.FirstPage.RightHeader.Text = “”
.FirstPage.LeftFooter.Text = “”
.FirstPage.CenterFooter.Text = “”
.FirstPage.RightFooter.Text = “”
End With
‘↓ここもプリンターの機種により異なる
Application.PrintCommunication = True
End Sub
‘————————————————————————–
4.ボタンを押して実行する。

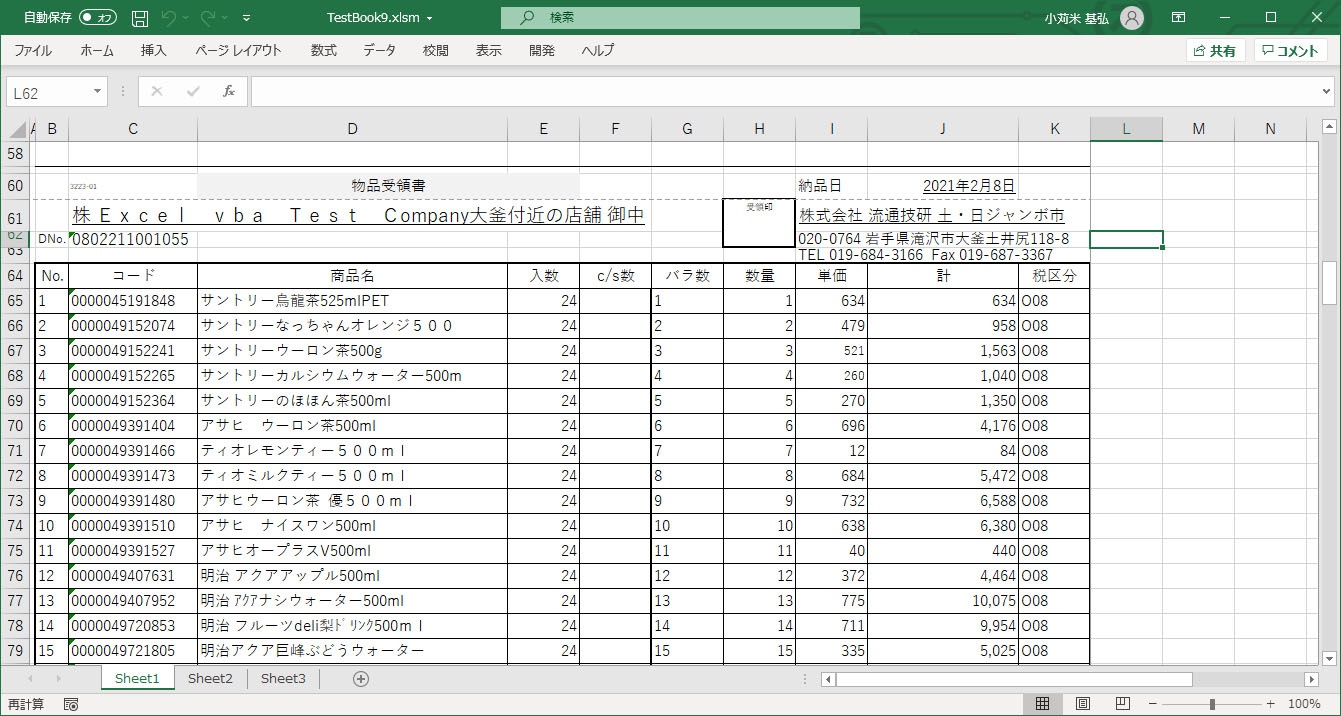
5.納品書の次は物品受領書、受領印の場所を作る。
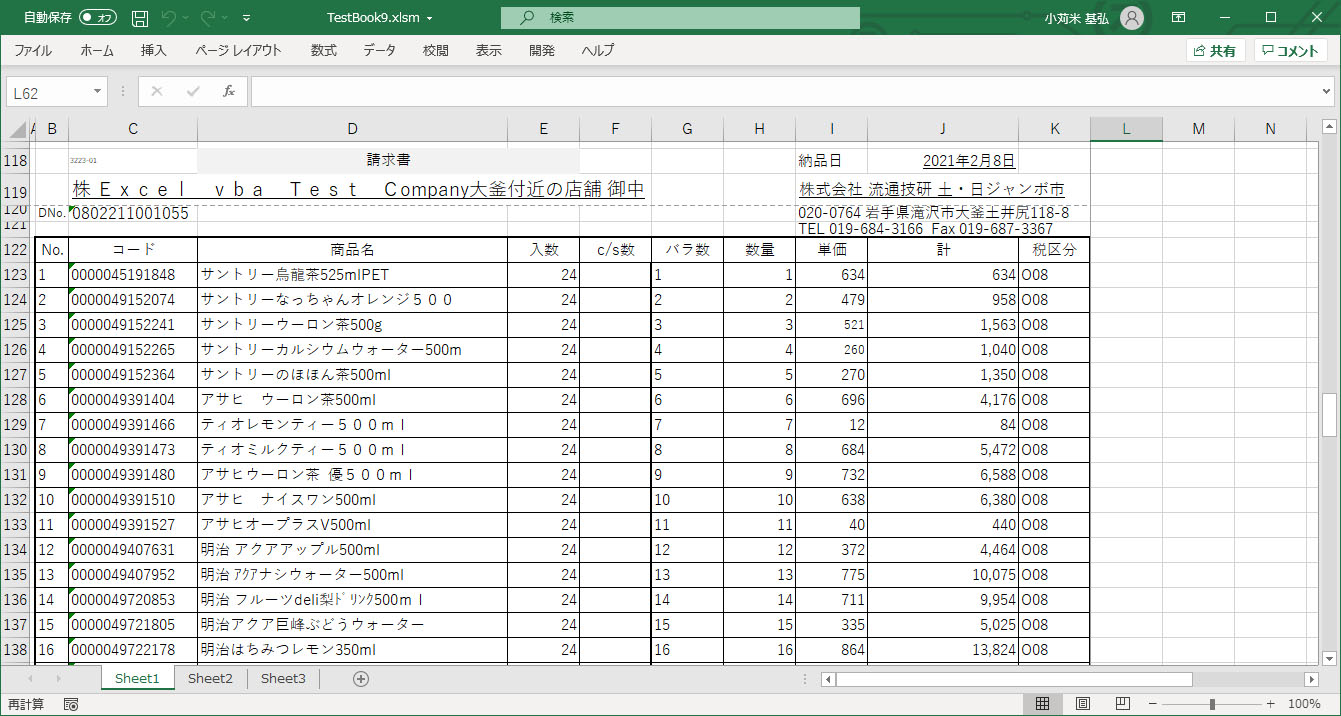
6.次は請求書
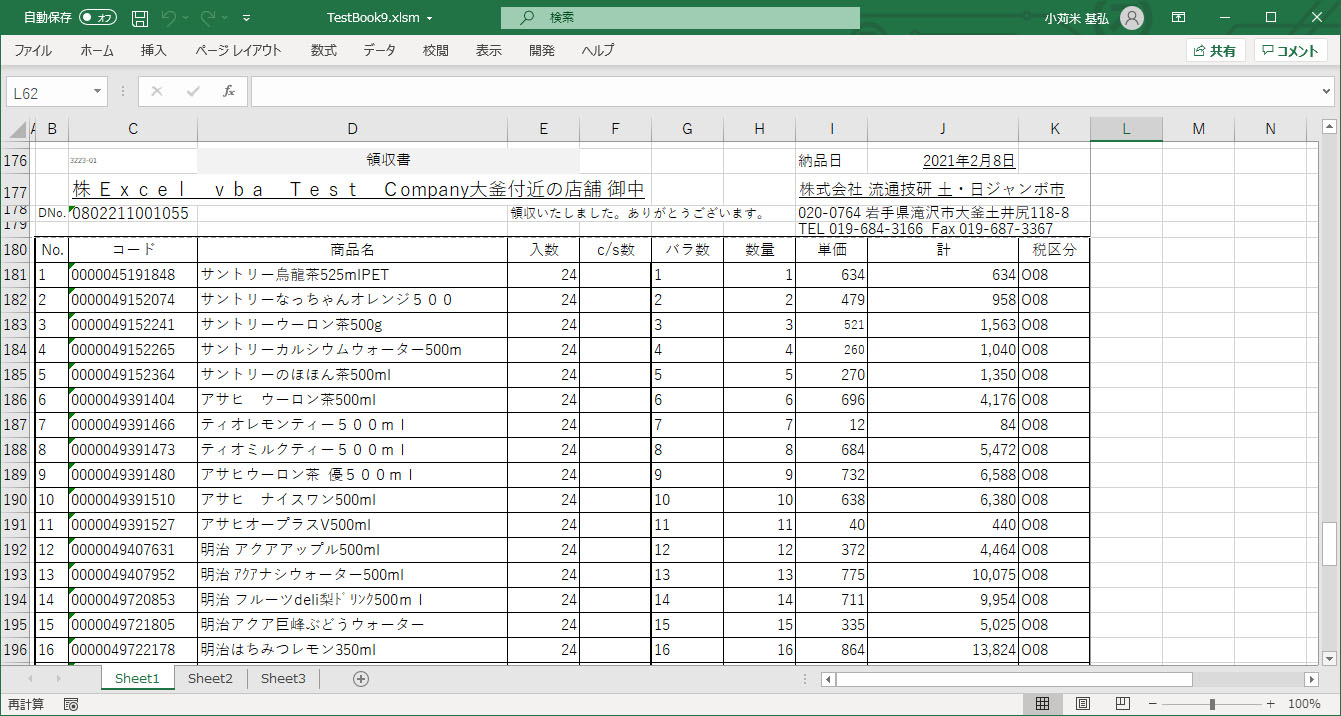
7.最後は領収証 ありがとうございました・・入れて・・
8.あとは印刷の設定をする・・・
エクセルはこのプリンターの設定が、機種によってさまざま異なる場合があるので
自分の環境にあわせてカスタマイズする必要がある。
6行だけの固定行でないので、ここは内容に合わせて・・・印刷タイトルやページ数などの
設定をマクロでかいておけば、楽になるはずです。